
Integrated Astronomical Observation System①
System Setup
1. Integrated Astronomical Observation System
This system is an integrated astronomical observation system designed for enjoying outdoor stargazing. It uses the Raspberry Pi 5—a compact, credit-card-sized computer—as its core to control and operate the observation equipment.
The Raspberry Pi 5 functions as a command center, controlling an equatorial mount (in this case, OnStep) using the INDI (Instrument Neutral Distributed Interface) communication protocol. INDI supports a wide variety of devices and offers flexible expandability.
Furthermore, by integrating with high-performance planetarium and observation control software such as KStars and EKOS, it enables automatic alignment and advanced observation support.
Furthermore, since you can operate the Raspberry Pi 5 desktop via a VNC connection from a Windows PC, you can control the telescope wirelessly from a remote location, such as inside a vehicle.
This page will guide you through the setup process for the Raspberry Pi 5, including network configuration.
2. System Configuration
2.1 Hardware Configuration
The system is configured to minimize cumbersome setup work in the field and prioritize smooth operation.
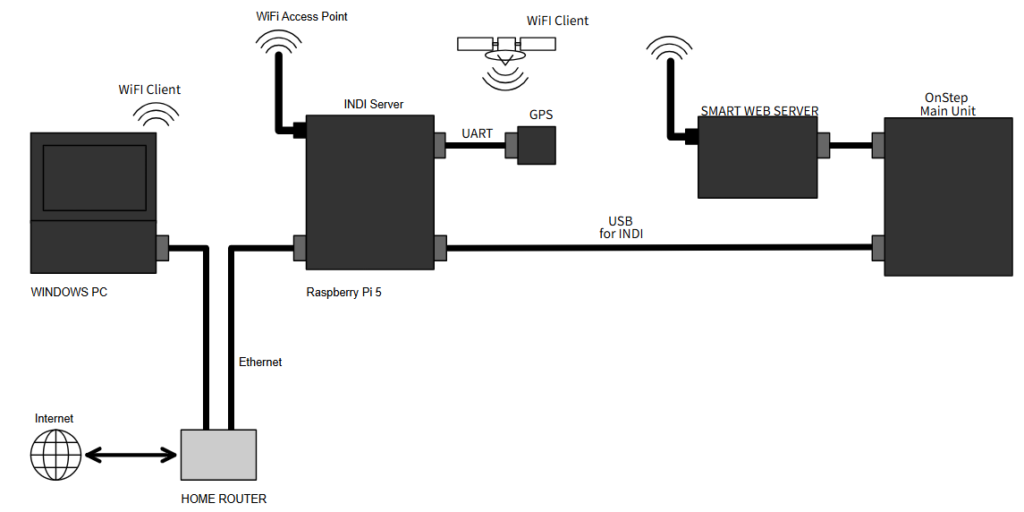
The Raspberry Pi 5 is set up as a Wi-Fi access point, and a Windows PC and OnStep’s SWS connect to that network as clients.
Furthermore, the Raspberry Pi 5 and OnStep are connected via USB and communicate and control each other through INDI.
Since the Raspberry Pi 5 is often connected to the internet at home, we assign the local Wi-Fi network to the observation system and a wired LAN connection to the home network. Simply plugging in a LAN cable provides internet access while simultaneously maintaining the Wi-Fi network for observations, allowing for smooth setup and data transfer.

| HW | Raspberry PI 5 (8G) |
| OS | Raspberry Pi OS (64-bit) Bookworm Release 25-11-24 |
The following is a list of network environments. Please note that this is merely an example; feel free to modify it as needed.
| 🌌 operations in field | 🏠 operations at home | ||
|---|---|---|---|
| RPi 5 | Wi-Fi access point name | FieldAP | FieldAP |
| wifi IP address | 192.168.50.1 (Access Point) | 192.168.50.1 (Access Point) | |
| Internet connection | N/A | Via Ethernet (wired LAN) | |
| Onstep SWS | Wi-Fi network | FieldAP | FieldAP |
| wifi IPaddress | 192.168.50.20 | 192.168.50.20 | |
| Windows PC | Wi-Fi network | FieldAP | FieldAP |
| wifi IP address | 192.168.50.100 | 192.168.50.100 | |
| Internet connection | Via USB tethering, etc. | Via Ethernet (wired LAN), etc. | |
2.2 Software Configuration
The following is a list of the software we use. All of it is open source and available for free.
| INDI | Device Control and Communication Protocols | It is an open-source communication protocol for controlling various astronomical observation devices, such as telescopes, cameras, focusers, and filter wheels. INDI runs on Linux and can be operated smoothly even on lightweight computers like the Raspberry Pi. |
| KStars | Planetarium software | This is a free, feature-rich planetarium software program that runs on Linux, Windows, and macOS, allowing you to view real-time star charts, search for celestial object information, and automatically align a telescope. |
| Ekos | Observation Automation and Instrument Control Module | This is an observation automation and instrument control module built into KStars. It allows you to control observation equipment such as telescopes, cameras, focusers, and autoguiders via INDI. |
3. Installing Raspberry Pi OS
Note: As of October 2023, Raspberry Pi OS has transitioned from being based on Debian 11 (Bullseye) to being based on Debian 12 (Bookworm). This change has resulted in significant changes to network behavior and initial setup.
You will need a Windows PC, a Raspberry Pi 5, a micro SD card, a wired LAN connection to the internet, and a power cable compatible with the Raspberry Pi 5.
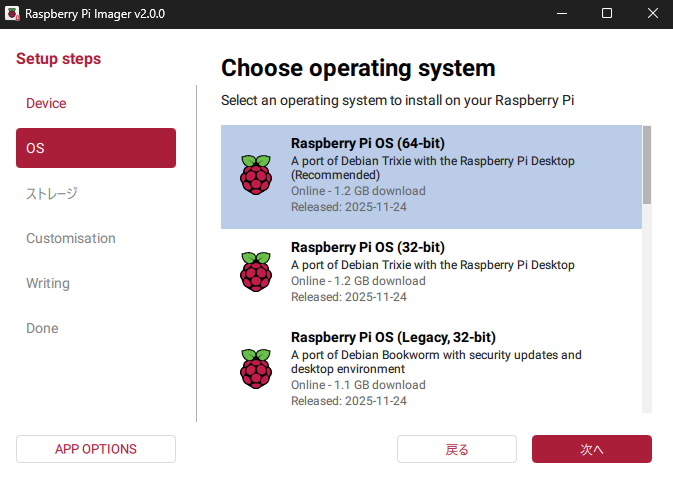
First, install the OS on the Raspberry Pi 5. Using a Windows PC and the Raspberry Pi Imager, proceed with the installation onto the SD card.
Select “Raspberry OS (64-bit) Bookworm” as the OS.
Follow the steps in the app to configure the settings, but be sure not to check the box for “Use Wi-Fi” or make any related settings. This is to prevent configuration conflicts when you later set up the Raspberry Pi in access point mode.
4. VNC Settings
Once the SD card has finished writing, insert it into the Raspberry Pi and power it on. First, connect a monitor, keyboard, and mouse to the Raspberry Pi to set it up. The first step is to set up the VNC (remote desktop) environment.
4.1 Changes to the Windows system
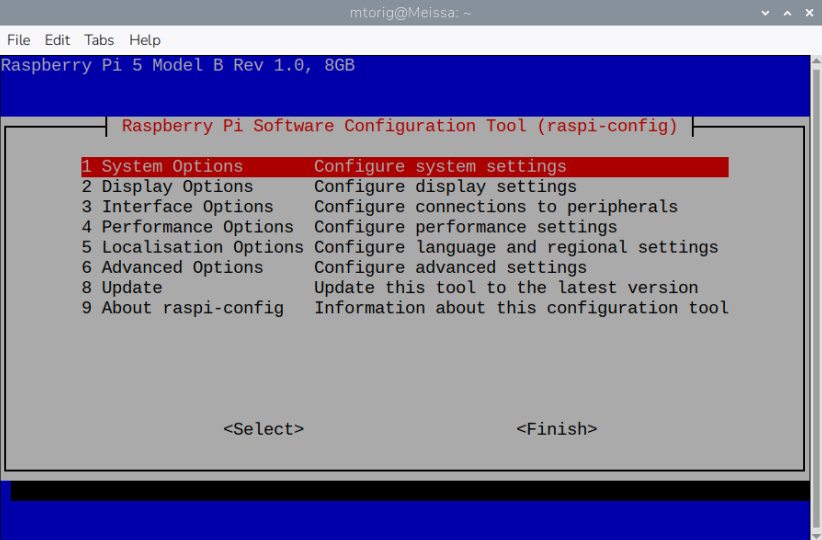
Open a terminal and run the following command to launch raspi-config.
sudo raspi-config
The Raspberry Pi 5 uses a new windowing system called “Wayland,” but there are some compatibility issues with VNC (remote desktop). Therefore, to ensure stable remote operation, we will switch to the traditional X11 (X Window System) method.
→ 6 Advanced Options
→ A7 Wayland
→ W1 X11
After configuring the settings, restart the system.
4.2 Enabling VNC
After restarting, launch Raspi-config again and enable VNC.
3 Interface Options
→ I3 VNC
This will display the VNC icon in the upper-right corner of the screen, confirming that VNC is enabled. Clicking the icon will allow you to view the Raspberry Pi’s IP address. You can then use Real VNC Viewer on your Windows PC to control the Raspberry Pi via Remote Desktop. Note that Real VNC Viewer can be installed from the Microsoft Store.
*At this stage, the connection will be via a wired LAN, but we will configure it for a Wi-Fi connection later.

5. Turning a Raspberry Pi into an Access Point
Set up the Raspberry Pi as a Wi-Fi access point (AP). This allows the Raspberry Pi to act as a host, enabling the Onstep mount controller and Windows PCs to connect to it as clients.
# Delete the existing “FieldAP” connection settings (to prevent duplication or configuration errors)
sudo nmcli connection delete FieldAP
# Create a new Wi-Fi access point connection (SSID: “FieldAP”, interface: wlan0)
sudo nmcli connection add type wifi ifname wlan0 con-name FieldAP ssid FieldAP mode ap
#Set a static IP address and configure in IPv4 sharing mode (to allow Internet access to be shared with other devices)
sudo nmcli connection modify FieldAP ipv4.method shared ipv4.addresses 192.168.50.1/24
# Security settings using WPA2-PSK (password is “xyzxyzxyz”)
sudo nmcli connection modify FieldAP 802-11-wireless-security.proto rsn 802-11-wireless-security.key-mgmt wpa-psk 802-11-wireless-security.psk xyzxyzxyz
# Disable PMF (Protected Management Frames) (to improve compatibility with older devices)
sudo nmcli connection modify FieldAP 802-11-wireless-security.pmf disable
# Turn on Wi-Fi
sudo nmcli radio wifi on
# Manually bring wlan0 up
sudo ip link set wlan0 up
# Start the configured access point
sudo nmcli connection up FieldAP
It should now be available for selection as a Wi-Fi access point on your Windows PC.
6. Windows PC Settings
Configure your Windows PC to allow VNC connections over Wi-Fi.
6.1 固定IP化
To prevent DHCP failures on the Raspberry Pi 5 and ensure a stable connection, assign a static IP address to the Wi-Fi adapter on your Windows PC.
IP address: 192.168.50.100
Gateway: 192.168.50.1
6.2 Configuring Routing Rules
Since the Windows PC is connected to both a wired LAN and Wi-Fi, it automatically selects which connection to use. To ensure stable operation, we will explicitly define routing rules.
1. Type “Command Prompt” or “PowerShell” into the Windows search bar.
2. Right-click the app that appears and select “Run as administrator.”
3. Enter the following command to view the list of interfaces:
route print
4. From the list displayed, note the interface number (e.g., 17) corresponding to the Wi-Fi adapter (e.g., Intel(R) Wi-Fi 6 AX201 160MHz).
5 To ensure that traffic destined for the Raspberry Pi 5 (192.168.50.1) is routed through the Wi-Fi adapter, add the following rule:
route ADD 192.168.50.1 MASK 255.255.255.255 192.168.50.1 IF 17 METRIC 1 -p
*Please replace “IF 17” with the interface number that corresponds to your environment.
This allows your Windows PC to reliably use both an internet connection and a local Wi-Fi network connection simultaneously. Once the setup is complete, connect your Windows PC to the Raspberry Pi 5 (FieldAP), and use Real VNC to connect by specifying the Raspberry Pi’s Wi-Fi IP address.
7. Samba (Shared Folder) Settings
Samba is software that enables file sharing between a Raspberry Pi and a Windows PC. With it, you can easily share files over a network.
7.1 Installing Samba
First, install Samba using the following command.
sudo apt update
sudo apt install samba samba-common-bin
7.2 Backing Up and Editing Configuration Files
Before editing the Samba configuration file \etc\samba\smb.conf, make a backup just in case.
sudo cp /etc/samba/smb.conf /etc/samba/smb.conf.bak
sudo nano /etc/samba/smb.conf
7.3 Disable Guest Access
This setting determines whether to allow access as a “guest” when authentication fails. For security reasons, we will comment it out and disable it in this case.
[global]
…
# This option controls how unsuccessful authentication attempts are mapped
# to anonymous connections
; map to guest = bad user
7.4 Disabling [homes] section
Samba has a section called [homes] that automatically creates a shared folder with the same name as the logged-in username. Since we don’t need this in this case, we’ll disable it by commenting out all the lines as shown below.
;[homes]
; comment = Home Directories
; browseable = no
; read only = yes
; create mask = 0700
; directory mask = 0700
; valid users = %S
7.5 Add shared folder settings
Please add the following code to the bottom of your Samba configuration file.
In this example, we are configuring the Public folder in the user’s home directory as a shared folder that can be accessed from Windows.
- In the “path” section, specify the path to the folder you want to share. Here, we’re using “\home\Public,” but you can change it as needed.
- Please replace with the <username> you are actually using on your Raspberry Pi.
- The “[PiShare]” part is the folder name that appears in Windows. For example, it will appear as \raspberrypi\PiShare in Windows Explorer. You can change this to any name you like.
[PiShare]
comment = Raspberry Pi Shared Folder
path = /home/<username>
browseable = yes
writeable = yes
guest ok = no
valid users = <username>
create mask = 0644
directory mask = 0755
Run the following command to set the password required for access.
7.6 Setting Passwords for Samba Users
Set a password to access the shared folder. Use the following command to add a user for Samba.
sudo smbpasswd -a <username>
*Please replace with the username you are actually using on your Raspberry Pi.
7.7 Restarting Samba
After configuring the settings, restart Samba using the following command. This completes the configuration on the Raspberry Pi.
sudo systemctl restart smbd
If you access \192.168.xx.xx\PiShare from a Windows PC, you will be able to connect to the shared folder.
8. Configuring the Firewall on the Raspberry Pi 5(option)
For security reasons, we will install UFW (a firewall). With this configuration, VNC connections via the wired LAN will no longer be possible; VNC connections will only be allowed via the local Wi-Fi network.
sudo apt update
sudo apt install ufw -y
Configure the firewall to allow access only to specific ports. You may need to change the allowed ports as necessary.
sudo ufw default deny incoming
sudo ufw default allow outgoing
sudo ufw allow from 192.168.50.0/24 to any port 22 proto tcp
sudo ufw allow from 192.168.50.0/24 to any port 5900 proto tcp
sudo ufw allow from 192.168.50.0/24 to any app Samba
sudo ufw enable
| Command | Intent of the Rule | Allow “Port” | Role in the system |
|---|---|---|---|
| sudo ufw default deny incoming | Reject All (Default) | All ports | From this point on, unless otherwise specified, all external communications will be blocked. This forms the foundation of our security. |
| sudo ufw default allow outgoing | Allow All (Default) | All ports | Allow the Pi 5 to freely send data to external sources for communications it initiates itself (e.g., internet access for updates, sending INDI data to OnStep, etc.). |
| sudo ufw allow from 192.168.50.0/24 to any port 22 proto tcp | Within the local network(192.168.50.x) | SSH (22) | Command-line operations (maintenance) on the Pi 5 are permitted only from devices (such as operator terminals) connected to the dedicated observation AP. |
| sudo ufw allow from 192.168.50.0/24 to any port 5900 proto tcp | Within the local network(192.168.50.x) | VNC (5900) | Allow remote control of the Pi 5 desktop (including KStars and Ekos) only from devices connected to the dedicated observation AP. |
| sudo ufw allow from 192.168.50.0/24 to any app Samba | Within the local network(192.168.50.x) | Samba | Allow Samba access only from devices connected to the observation-only AP. |
| Command | Meaning |
|---|---|
| sudo ufw enable | Enable UFW |
| sudo ufw disable | Disabling UFW |
| sudo ufw status | Displaying the ufw status |
9. Smart Web Server
We will modify the source code so that OnStep automatically connects to the Raspberry Pi’s access point as a client. We will modify the OnStep SWS (Wemos) source file and upload it. With this change, OnStep will automatically connect to the RPi 5’s access point.
📄ExtentedConfig.h
// These settings are stored in NV (EEPROM) and the SWS will not recognize the settings below except on the first upload unless
// NV is wiped, these settings (where applicable) can be changed at runtime however.
#define AP_ENABLED false // true, Wifi Access Point Enabled. Adjust
#define AP_SSID “ONSTEP” // “ONSTEP”, Wifi Access Point SSID. Adjust
#define AP_PASSWORD “password” // “password”, Wifi Access Point password. Adjust
#define AP_CHANNEL 7 // 7, Wifi Access Point channel. Adjust
#define AP_IP_ADDR {192,168,0,1} // ..,168,0,1}, Wifi Access Point IP Address. Adjust
#define AP_GW_ADDR {192,168,0,1} // ..,168,0,1}, Wifi Access Point GATEWAY Address. Adjust
#define AP_SN_MASK {255,255,255,0} // ..55,255,0}, Wifi Access Point SUBNET Mask. Adjust
#define STA_ENABLED true // false, Wifi Station Enabled. Adjust
#define STA_SSID “FieldAP” // “Home”, Wifi Station SSID to connnect to. Adjust
#define STA_PASSWORD “xyzxyzxyz” // “password”, Wifi Station mode password. Adjust
#define STA_DHCP_ENABLED false // false, Wifi Station/Ethernet DHCP Enabled. Adjust
#define STA_IP_ADDR {192,168,50,20} // ..168,1,55}, Wifi Station/Ethernet IP Address. Adjust
#define STA_GW_ADDR {192,168,50,1} // ..,168,1,1}, Wifi Station/Ethernet GATEWAY Address. Adjust
#define STA_SN_MASK {255,255,255,0} // ..55,255,0}, Wifi Station/Ethernet SUBNET Mask. Adjus
11. Installing INDI / Kstars
The easiest way to install INID Kstar / Ekos is to use the batch file available here. Run the following shell script.
*Installation takes about an hour.
git clone https://gitea.nouspiro.space/nou/astro-soft-build.git
Move to the folder, run the shell script (install-dependencies.sh), and install the dependency files.
cd astro-soft-build
./install-dependencies.sh
You can build both the stable version and the latest version, but run the shell script for the stable version (build-soft-stable.sh).
./build-soft-stable.sh
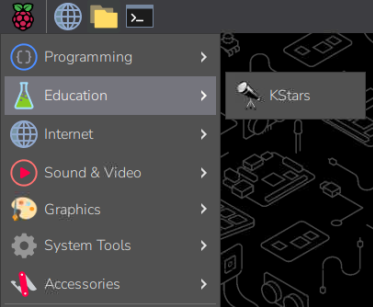
Now you can launch Kstars by clicking the raspberry icon in the upper-left corner of the screen, then selecting “Education” and “Kstars.”
12. Automatic Wi-Fi Connection on Windows PCs (Optional)
In Windows, if an Ethernet connection is active, the system may not automatically connect to Wi-Fi at startup. In this guide, I’ll show you how to use a batch file and Task Scheduler to automatically connect to Wi-Fi at startup.
10.1 Creating a batch file
Open Notepad and copy and paste the following text. Save the file with a name such as “ConnectWiFi.bat”. When saving, change the “File type” to “All Files” and make sure the file extension is .bat.
@echo off
REM Please wait 30 seconds
echo Connecting automatically to the WiFi FieldAP. Waiting for startup to complete.
timeout /t 30 /nobreak
REM Connect to the specified access point.
netsh wlan connect name=”FieldAP”
exit
10.2 Task Scheduler Settings
To automatically run a batch file when your PC starts up, using the Task Scheduler is the most reliable method. It is more stable than placing the file in the Startup folder, and allows you to set administrator permissions and a delay (e.g., 30 seconds).
1. Type “Command Prompt” or “PowerShell” into the Windows search bar and press Enter.
2. Run the following command to launch Task Scheduler.
taskschd.msc
3. Creating a Task
Click “Create Task…” in the menu on the right.
📌 General Tab Settings
Name: Enter any name you like, such as “Auto_WiFi_Connect”.
Security options:
Select “Run only when the user is logged on.”
Check the box next to “Run with highest privileges.”
📌 Trigger Tab Settings
Click the “New…” button.
Task start: Select “At logon” from the drop-down menu.
Specify delay: Select 30 seconds.
(This duplicates the timeout /t 30 command in the batch file, but we’re setting it here just to be safe.)
📌Settings for the Operations Tab
Click the “New…” button.
Action: Select “Start a program.”
Program/Script: Enter the full path to the “ConnectWiFi.bat” file you created in step 9.1
(Example: C:\Users\YourName\Documents\ConnectWiFi.bat).
📌Settings on the Conditions tab
Uncheck the box labeled “Start the task only when the computer is connected to AC power.”
Click “OK” to save the task.
✅Approximately 30 seconds after the PC starts up, the Wi-Fi connection command is executed. This automatically enables Wi-Fi even if a wired LAN connection is active, and connects to the specified SSID.